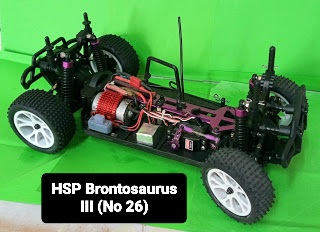
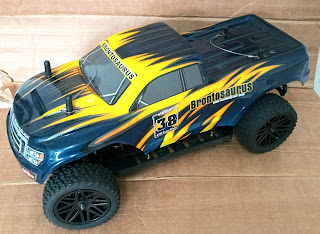
This is the first build up a Brontosaurus 94111 project.
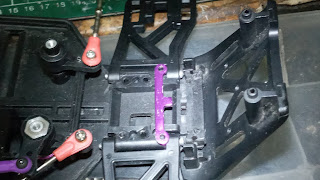
1) First problem come regarding the use other brand steering system, i need to readjust the position until finaly put it up side down. That the fun thing to learn dealing with modification.
2) Second problem i have not enough suspension pin. So find big rivet only take the pin and make grove at end. Take time also, but the daimeter litter smaller, so i use aluminium thin foil wrap it two layer, now the suspension not that loose.
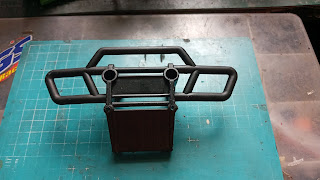
3) Third no front bumper.so take out from my first brontosaurus that i add another 1/8 Hobao bumper in front. Then cut out a stoper from HongNor to secure the bumper and the pin falling out if the E clip drop.
4) Fourth i have few nitro body but can fit in too short, next looking for new one.
5) Fifth problem found out the rear shaft will come out, so change the rear drive shaft from Thunder tiger Ts4n longer. Add inside 1 bush bearing and a ballbearing on top.
6) DIY two bracket from a long electric coper rod, to hold a esc switch.
7) I DIY a center propeller shaft from a thick aluminium hollow rod at each end put a hard needle, super glue + metal bonding glue to hold the needle and cover end hold.
8. For the drive gear i cut from a thin aluminium to make the cover.
For Brontosaurus original no body and battery the weight around 2kg. If with full options parts Aluminium alloy it weight come to 2.5kg ++. The heavier is the aluminium chassis.
Sum for additional parts to buy. RM68.80 UPDATE 4/7/2020
 |
| My two units almost up grade to aluminium parts. My May 2020 photo |
 |
| The extra plastic parts. |
 |
| The rim and tyre. 2 more not in. |
 |
| Esc , motor, servo, receiver, ball bearing. |
 |
| The plastic chassis. My second brontosaurus i change to aluminium. |
Do some assembly and Modification first
 |
| All the drive arm front and rear. |
 |
| I didn't have all the suspension pin, so i DIY using Rivet nail and at end a small grove for E clip. Using this modified pin only use one E clip, ori using 2 clip.The black is original pin using both end with E clip. |
 |
| The original pin is 0.3mm diameter, but the rivet is 0.2.5 diameter, what i did is i wrap the rivet with aluminum foil . |
 |
| Wrap two layer. |
 |
| Aluminium foil can last long not paper tape. |
 |
| For the front and rear hub same DIY two type of pin, first center pin with a deep grove in center so can tighten with screw, the second using rivet nail at end using E clip. Black original. |
 |
| Only plastic hub at bottom have the tighten screw not For aluminium hub, only using E clip at both end. |
 |
| Only using E clip at one end. |
 |
| Change all using Thunder Tiger shock ball head screw. |
 |
| Use 2 ball head holder, but for this truck using only 4 damper. Just put incase i buy another 4 damper. |
 |
| Using a Thunder Tiger steering arm, more tougher. |
 |
| I remove all my second Brontosaurus, test the thunder tiger steering set can fit. Need to grind the lhs arm and chassis so the steering can turn more. top black is original. |
 |
| The ori position have problem not fully lock, touching servo. Readjust back whare i put up side down, whare the spring tension is at bottom. So the steering arm at top move freely |
 |
| Upside down so that the arm not touching the servo. |
 |
| Use my DIY pin. No need to add the reinforced plate |
 |
| Remove all the second brontosaurus parts before the aluminium chassis arrive and this chassis for my third brontosaurus. |
 |
| After remove all screw u can see a deap hole on the plastic chassis. So need to change to aluminium. |
I didn't have front bumper. So what i did in my Brontosaurus 1, i add extra bumper from 1/8 Hobao big foot bumper. I remove it and put at my brontosaurus 3. U can see it in top picture.
 |
| Bottom view |
 |
| Inside view. Need to cut away few plastic bracket. |
 |
| Using 3 screw and nut to tighten on chassis, |
 |
| This is suspension reinforcement from HongNor Rc top for rear bottom already modified for front. I modified to hold the modified front bumper and also a backup stoper for suspension pin came out if the E clip missing. Brontosaurus using a aluminium to hold this two pin |
 |
| Brontosaurus using to hold the pin. |
 |
| To hold the front bumper and pin |
On 10/5/2020 i buy few more parts from shoope and lazada for my two brontosaurus, parts not yet arrive. A black aluminium chassis, blue and purple aluminium gearbox mounting, long rear drive gear, motor mounting, rear gear box. i will show it when arrive and the assembly rear wheel drive bronto. May be in this project if important parts didn't have i will buy.
Still waiting for some parts, but not yet reach, so make decision build what i have for my third brontosaurus. Mostly all parts is plastic. Finish on 18/5/2020. First stage. All parts in. second adjustment.
 |
| The front gear box, i remove the gear and close all the hole with aluminium foil. |
 |
| Prevent dirt entering. I didn't have center shaft. Keep if next time a can get free i will fix it 4x4. |
 |
| No front bumper, modified one |
 |
| The no beam on top bumper to shock tower |
 |
| Tighten with 3 screw this bumper is hard. |
 |
| Front road using different turn buckle and kyosho ball end holder. |
 |
| Eazy fit the center bracket to the Thunder Tiger Steering. |
 |
| Rear drive gear thare no cover for it. I will cut out a pcs of hard aluminium to close it. |
 |
| First try outs the DIY cover not that good need to do another one. |
 |
| Rear suspension |
 |
| Rear bumper |
 |
| Add a plastic handle bar from kyosho spider, at center, eazy carry the truck |
 |
| All electric parts in same location, soon i will put in a 1/8 Brushless ESC and Motor see how fast this truck can go. |
 |
| No front drive shaft. |
 |
| No centet shaft |
 |
| All the 4 corner add stoper for battery. Plastic from my loose parts for kyosho. |
 |
| Modified 2 post for battery. |
 |
| Only use 4 shock absorber and need to put spacer on spring too soft. |
 |
| Bottom view |
 |
| Rear drive shaft at lhs longer and rhs original short. That why i read some complaint regarding brontosaurus truck shaft always came out or dent. Solution find longer shaft. |
 |
| Need to add a cover bushing on rear hub inside and ballbearing on top. |
 |
| The coper bushing inside. Just act as a spacer. Out side a ball bearing . |
 |
| Ball bearing on top.so the drive shaft more higher. The dog bone more inside. |
 |
| Both shaft end at center, so i can do adjustment on the camber. |
 |
| HSP didn't give this switch cover. Mosly the switch is small follow the ESC |
 |
| DIY the switch holder, my new brontosaurus didn't have the switch cover. |
 |
| Use a Thunder Tiger switch rubber cover, |
 |
| DIY a center propeller shaft, later i will fix it. Now just play with rear wheel drive. |
 |
| DIY a receiver cover to protect from dust or water. Not a water proof cover |
 |
| Cover up the receiver to prevent more dust or water enter. |
 |
| Add two cooling fan on ESC and motor. Is a DC 5V brushless with big fin. |
Finish assembly from scrap parts. Next i will put in the hard body from QD Mitsubishi evo. But not match, now i slowly modified necessary parts into this bronto. I will put in a 1/8 brushless ESC but now waiting extra money to buy the motor.
 |
| Done my third brontosaurus from scrap parts |
 |
| Front view with different bumper. When i test it very power full at rear wheel, spining a lot all torque is in rear. But front too light no grip on tyre so need to put weight 60g in side the front gear box.. |
On 23/6/2020 go for RC parts hunting in seremban RC shop, buy a half cut rear for only Rm20. In this half cut brontosaurus have 15 parts, each parts course me Rm1.33
The parts is
1. 2 wheel
2. 1 Chassis
3. 1 Motor
4. 1 ESC
5. 1 Axle set
6. 1 Main gear / 1 pinion
7. 1 Radio tray
8. Suspention set = 2 arm, 2 hub, 4 bearing, 3 wheel hex, 1 UJ, 2 suspension rod,
9. 1 Propeller shaft
10. 1 Rear bumper
11. 1 Shock tower + 2 body post
12. 1 Gear cover set
13. Other small parts = 2 battery pose, 2 servo holder, 1/2 steering , 1 antena bracket, 1 body post, screw
14. 4 pcs shock absorber set
15. Motor mounting
Now i can fix into my 3th bronto with 4wd, add another 4 shock and gear cover.
History for this half cut brontosaurus, is not a new, is secondhand. Mosly when customer need parts the shop owner open from new brontosaurus parts. But this units play before because chassis scratch and dirt stuck on some parts.
Now still have extra spare parts. Don't one to create another brontosaurus.
 |
| With 540 motor, gear cover, radio tray |
 |
| With 4 shock 1 damage, no llinkage, with rear bumper |
 |
| Front no full steering, gearbox, suspension, servo, bumper part. |
 |
| With center shaft Fly sky Receiver |
 |
| With rear hub, tyre rim. |
 |
| Rhs with UJ, hub, tyre/rim. |
 |
| One shock missing the cup. |
 |
| Main gear small worn off |
 |
| Scratch under chassis |
 |
| Add 2 shock absorber on front and back. No more using spacer on spring. |
 |
| Cover up the main gear and pinion, add greese on gear reduce wear. |
 |
| Almost done another parts short drive gear for front to make it 4x4. |
I am odering front complete HSP gear box with short shaft after 3 weeks for Rm17.20. on 3/7/2020 i get the parts, again second time disappointed, i order acording photo given loose parts with short shaft, it come with complete with long shaft. Now again i order only the short shaft 02030. But strange is outside packing return complete packing with parts number of all the parts include the short and long shaft. That ok so full assembly then open up the axle case wala no greese inside clean. If other people buy didn't check and fix run, then damage the gear. Always alert parts from china need to check before assemble. Same with my ESC in their posting water proof but get the thing 100% not water proof.
 |
| Oder from lazada. Half assemble parts. With short shaft |
 |
| Gear box complete set with all the parts number |
 |
| Pack in a plastik complete axle |
 |
| Start remove all parts and check. |
 |
| I order 02030 come 03015 |
 |
| No greese at all clean |
 |
| Packing include all the parts , marking include 2 type of shaft. |
13/9/2020 found the front bumper cheap only Rm5 loose parts. I remove the TT bumper now look original
 |
| Only Rm2.50 secondhand |
Below my 3 HSP Brontosaurus Truck.
 |
| Lhs blue buy new and with option aluminium parts is 2.195kg. Middle buy secondhand ,weight after more option parts 2.205kg. last build from scrap most plastic parts only 1.900kg. |
 |
| This units i can change to buggy car .using 1/10 buggy rim and tyre. The front and rear steering hinge not touching the rim. Now is lowered to ground. Can get a buggy body for cheap i will try it. One car two moder. |
 |
| Rhs view. The tower i try using my SCT truck but then i need to change all the shock absorber more expensive may be next time. |
 |
| 18/9/2020 scrap serching another Rm60. 2 brontosaurus body, 2 wheels, spare parts, brushless motor. |
 |
| Some parts for nitro |
 |
| The front suspension parts |
 |
| All for only Rm20 2 body |
Finally the front drive gear reach from china reorder again. Get it on 1/10/2020. Now this truck is 4x4.
 |
| Front gear is short. |
 |
| Full working front gearbox |
The complete 3 of my HSP Brontosaurus 94111. Fully 4x4.
 |
| Blue Rm450, Purple Rm100, Purple Rm0 |
 |
| The body, Jeep Wrangler, Brontosaurus red , Brontosaurus yellow. |
This the second project change from brontosaurus big wheels to Brontosaurus pickup truck.
New modification is on 29/7/2021. Thing to change
1. All 4 suspension arm from 94123
2. All 4 pcs dogbone 61mm
3. All 6 pcs adjustable linkage.
4. Use only 4 damper.
Still use main chassis/component, shock tower, shock absorber front/rear bumper, c hub, front/rear wheel hub carrier,
Front suspension using 94123 parts
 |
| The different 94111 and 94123 |
 |
| The adjustable linkages shorten |
 |
| The dogbone shorten 61mm |
This rear suspension arm
 |
| Dogbone 61mm need to buy |
 |
| Steering adjustable linkages shorten |
 |
| Using buggy rim and tyre |
 |
Rear only using 2 shock absorber inside
|
 |
| Front shock 2 pcs inside |
Because have extra shock absorber that i buy wrong parts, i fix to this units. Is a adjustable damper is for Crawler.
 |
| Lhs from brontosaurus big, rhs small for Crawler |
 |
| Front |
 |
| Rear |
6/9/2021 add 4 pcs battery side stopper. Buy for rm8.
11/9/2021 got the 61mm dogbone, set for Rm18.
 |
| Front |
 |
| Rear |
Will show photo if add more parts.
Enjoy RC


Comments
Think to rebuild it next week..
So your upgrade and modification will be my reference.
I just play it and normal condition.. Not too hard pusing it to the limit..
Thanks for your post on what you have done