RC44. My Memory Having RC Car. My No 24 RC. Yonezawa Hi Power Off Roader Buggy The Missiler 1/10 1984.
On 14/10/2018 morning another sunday, go for treasure hunting in flea market Seremban. Stall after stall go threw nothing intrest me. Last is a second hand shop. Just went inside at rhs my eye cought attention on a box that a buggy rc picture on it. Closer look woooooo is a 1/10 buggy, look at the box all badly damage torn. Take it to a side and open it, wala a red buggy inside, a remote, Folded instruction manual, the battery charger. Take out the buggy and check the rear tyre already damage and motor can't turn. Looking for the brand Yonezawa, i have no idea. But made in japan. Ok i want it, the prices on tag Rm80, ask for best prices Rm50 but ask to reduce to Rm40. Deal sold yahoooooo. I buy another vintage RC 1/10 Buggy. This my 24 collection.
After paying go to a shop taking my breakfast and slowly look into the net and found out it around 1980 Under YONEZAWA CORPORATION JAPAN. This the second model 1/10 buggy from Yonezawa Corporation My is from 1984 according to the instruction manual printed, but in the box is 1985. The box buggy is yellow but my is red.

Back home slowly snap the picture and remove parts, study this buggy. The Electronic component inside the car have 3 battery compartment, Transmiter with 6 AA battery, Receiver with 4AA battery and to run the motor using 7.2v Nicd battery. Very funny 1980 electronic is individual current. This buggy has been repair by previous owner because i got a wire diagram inside the compartment. The wire for motor not proper sholdering and insulater, water can enter. For the motor can't turn. After removing the motor it stuck and i turn slowly it turn. It stuck because rust on motor carbon. Greese using hard type but all dry up like a peace tin foil, single speed. All moving component using plastic bushing can change to ball bearing. All tyre rubber become soft due to long storage. For rear tyre damage but front still can be use. Rear wheel rim can be change and using hex adapter. Servo for steering different can see the motor, the Esc using mechanical and servo to control it. The rear swing axle on rhs mounting damage but wrongly modified with a long bend screw.
The faulty found
After paying go to a shop taking my breakfast and slowly look into the net and found out it around 1980 Under YONEZAWA CORPORATION JAPAN. This the second model 1/10 buggy from Yonezawa Corporation My is from 1984 according to the instruction manual printed, but in the box is 1985. The box buggy is yellow but my is red.
About this company, Also known as Yono or Y. Founded in1950 Tokyo. Production in electrically operated and mechanical toys. Involve in radio control year 1980 first is 1/10 Wave Hunter buggy.
Start blogger = 17/10/2018.
Update blog = 4/2/2026.
1984 - 2026 = (42 Years )@
Made in Japan (🇯🇵)

 |
| Not my buggy. Just to show the first product buggy |
Back home slowly snap the picture and remove parts, study this buggy. The Electronic component inside the car have 3 battery compartment, Transmiter with 6 AA battery, Receiver with 4AA battery and to run the motor using 7.2v Nicd battery. Very funny 1980 electronic is individual current. This buggy has been repair by previous owner because i got a wire diagram inside the compartment. The wire for motor not proper sholdering and insulater, water can enter. For the motor can't turn. After removing the motor it stuck and i turn slowly it turn. It stuck because rust on motor carbon. Greese using hard type but all dry up like a peace tin foil, single speed. All moving component using plastic bushing can change to ball bearing. All tyre rubber become soft due to long storage. For rear tyre damage but front still can be use. Rear wheel rim can be change and using hex adapter. Servo for steering different can see the motor, the Esc using mechanical and servo to control it. The rear swing axle on rhs mounting damage but wrongly modified with a long bend screw.
The faulty found
1. Box damage
2. Electrical fault
3. Front rubber tyre become soft long storage.
4. Lhs bumper frane damage
5. Lhs chassis miner crack
6. Missing remote antenna.
7. Motor can't turn stuck.
8. No ballbearing use on wheels
9. Rear 2 tyre damage too long storage become soft
10. Rear motor housing damage, at rhs been modified
11. Rear wheel hex pin bend.
12. Sand inside motor
13. The greese in drive gear total dry.
Specification of this buggy
1. Scale 1/10 Off Road Racer
2. Size Length 383mm Width 139mm
3. Motor Mabuchi RS 540S
4. Battery For driving motor 7.2v Nicd, Transmitter penlite um3 x 6pcs, Receiver Penlite um3 x 4 pcs.
5. Suspention Front Trailing Arm, Rear Swing axle mono shock.
6. Frequency 27.255Mhz build in. No changeble crystal.
7. Rear wheel drive. no transfer gear.
8. 1 speed
9. Esc with two speed
Below i will show the condition of my buggy before total clean up and repair
Super Hetrodyne also call superhet. A type of radio signal that used frequency mixing to convert a received signal to a fixed intermediate frequency witch can be more conveniently processed that the original carrier frequency. Woo look like ers 80s super Hetrodyne very good frequency. Like today 2.4.
The next photo is after cleaning and assemble back all parts.
That the end resault, i manage to repair and total clean. All electrinic function but not 100%.Still have some glichering due to old system but anyware still can function left right and forward reverse. My no 24 collection. Thanks.
Answer to question given
Hope u get what u want.
Specification of this buggy
1. Scale 1/10 Off Road Racer
2. Size Length 383mm Width 139mm
3. Motor Mabuchi RS 540S
4. Battery For driving motor 7.2v Nicd, Transmitter penlite um3 x 6pcs, Receiver Penlite um3 x 4 pcs.
5. Suspention Front Trailing Arm, Rear Swing axle mono shock.
6. Frequency 27.255Mhz build in. No changeble crystal.
7. Rear wheel drive. no transfer gear.
8. 1 speed
9. Esc with two speed
 |
| This not my just to show the good condition box |
 |
| This the condition of my buggy box. |
 |
| Box side view |
 |
| Side 1/10 The Missiler |
 |
| Another side |
 |
| HI POWER OFF ROADER |
 |
| Bottom view |
 |
| Torn box need to glue and add solofin tape. |
 |
| The best is Made in Japan so the quality is good. |
 |
| In the box The Red buggy not yellow acording on box cover. |
 |
| The transmitter missing antenna. |
 |
| The Transmitter stick type. |
 |
| Control stick and power on / off |
 |
| Steering control stick left and right . Bottom is the steering Trim adjustment. |
 |
| The forward and backward stick and power control trim. |
 |
| The power on/off button and led indicator |
 |
| Top antenna location. Missing |
 |
| Side view |
 |
| Back view whare battery location. |
 |
| Using 6 AA battery. |
 |
| Battery in |
 |
| Led light up ok |
 |
| Inside the remote simple |
 |
| ori antenna missing using my spare toy grade antenna |
 |
| The battery charger for the 7.2v NICD.. |
 |
| Not tested yet |
 |
| The wire also become harden |
 |
| The charging port on body for 7.2v Nicd Battery. |
 |
| At the transmiter compartment the instruction manual at bottom . |
 |
| Fold it into round |
 |
| Open up a big paper size of 2 A4 paper. |
 |
| Front page |
 |
| First page |
 |
| Second page |
 |
| Third page |
 |
| Fourth page |
 |
| Last page |
 |
| The red buggy |
 |
| No broken parts. |
 |
| Rhs view |
 |
| Top view |
 |
| Front view |
 |
| Rear view |
 |
| Bottom view |
 |
| The copyright. Made in Japan |
 |
| The lock key to remove body from chassis |
 |
| Side by side |
 |
| No structure damage only sticker |
 |
| Some sponsor sticker |
 |
| The crome cover look like a engine top cover |
 |
| Rear wing |
 |
| Fold in side mirror |
 |
| Fold out |
 |
| Inside view |
 |
| Use 4 AA Battery for receiver |
 |
| Battery in |
 |
| The white connector for 7.2v battery for driving and the power on/off switch |
 |
| The front tyre thinner and rear big mosly buggy car using this size. |
 |
| Front rubber tyre with 4.50-15 inch and Off - Roader singn. |
 |
| The trade almost 10% left. |
 |
| The front wheels using 2 plastic bushing can be change to ball bearing |
 |
| Front steering arm no greese is apply too dry |
 |
| 2 each side plastic bushing |
 |
| All parts remove front suspention |
 |
| Rear tyre 16.50-15 inch with Off-Roader singn |
 |
| The trade spick almost gone. |
 |
| Lhs rear,Long storage rubber become soft and harden |
 |
| Rhs rear, Crumple in. If i remove the tyre may be will fall aparts the rubber no more elastic. |
 |
| The special rim with 5 hold attach on the plastic hex. |
 |
| The wheel hex |
 |
| It hold by a pin like new RC |
 |
| From top |
 |
| Both pin bending due to over tighten |
 |
| The rim patent in and out |
 |
| Don't know what it for after look into the manual haaa a plastic wrench for wheels nut. |
 |
| Use for long time it will worn off. |
 |
| Front bumper |
 |
| Crack bumper normal for secondhand RC |
 |
| Front suspention Trailing Arm. |
 |
| Toy grade shock absober |
 |
| Rear swing axle with single shock absober. |
 |
| Toy grade shock |
 |
| Toy grad shock |
 |
| The steering linkage a servo with 2 non adjustable rod. |
 |
| Plastic servo horn |
 |
| After remove the electrical cover the servo not fully in the casing. The motor apead out that can couse water or sand entering. 80s servo not one pcs like today seal from dust. |
 |
| No cover at back and can bunch of wire. |
 |
| Rear axle case |
 |
| The motor location |
 |
| Complete axle remove |
 |
| Remove the motor cover. Look like this motor stuck can't turn |
 |
| The motor look new |
 |
| Pinion gear top housing rusty |
 |
| After turn left and right the motor can turn freely |
 |
| Mabuchi 540s motor |
 |
| Test on a battery can turn slow need to spray with WD40 remove the dust. |
 |
| Removing the gear cover |
 |
| Due to long storage the greese dry up become a thin filem. |
 |
| Single speed |
 |
| All 4 plastic bushing can change to ball bearing |
 |
| Not using transfer gear. like other toy grade with low and high gear. |
 |
| All the axle parts |
 |
| Single speed gear |
 |
| the long shaft |
 |
| A modified rear axle mounting by old owner. The screw really difficult to open really tight and un even when screw come out. |
 |
| The axle out but screw stuck is bend |
 |
| A fail modification |
 |
| The bracket broke but force in until screw bend. |
 |
| The antena location |
 |
| Removing the electronic cover top |
 |
| Bottom cover |
 |
| Miner crack chassis |
 |
| 1980 system |
 |
| Servo to control mechanical speed .(ESC) |
 |
| Problem using this when battery out of juce it will not go back to 0 position. Like ESC. |
 |
| Front steering servo. The both servo not fully seal. Buggy most run on dusty road too long small dust or water will damage it. |
 |
| Charging port |
 |
| The wire to motor not proper seal |
 |
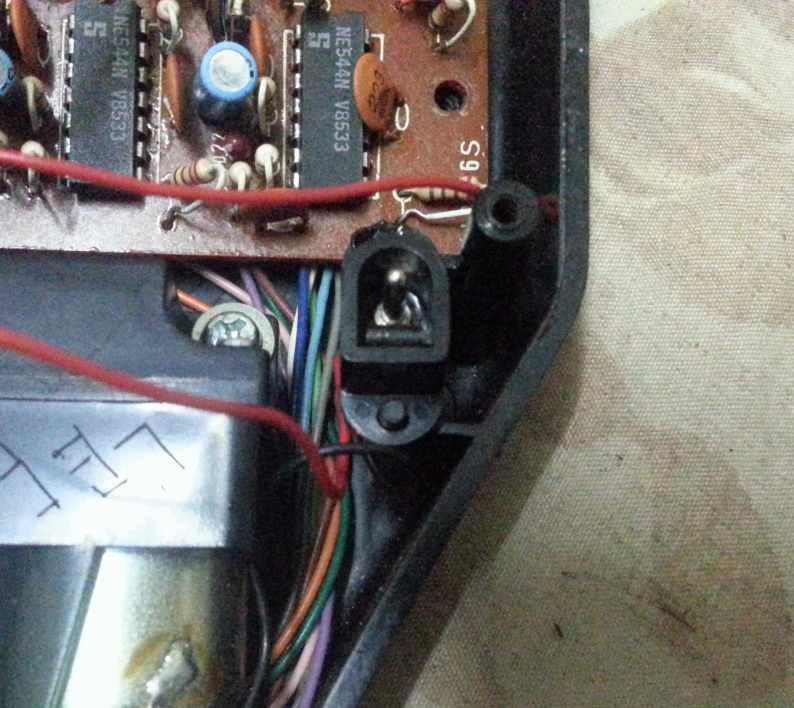
| Found a pcs of paper at the circute board. |
 |
| An old wire colour and it location from old owner. |
 |
| Top view elecyronic component remove from chassis |
 |
| Bottom view so many wire. |
 |
| The chassis parts |
 |
| Body parts remove |
 |
| The tyre and rim |
 |
| Inside and outside rim |
 |
| Small size rim |
 |
| Compare the rim size is smaller then normal 1/10 rim. |
 |
| Next is to clean it |
The next photo is after cleaning and assemble back all parts.
 |
| Fully washing |
 |
| Done assemble the electronic component |
 |
| Modified the wire more longer for motor. So if next time remove no more using soldering. Just plug out the D plug |
 |
| Bottom view |
 |
| Add new white greese. For the ball bearing i am using back the bushing. Need to order from bearing shop. Look alike my spare bearing but diffrent at center daimeter |
 |
| The rear axle. For the motor i add a male D plug. |
 |
| Eazy to remove |
 |
| Done total service |
 |
| The daimeter of the shaft bigger. |
 |
| Battery in, Testing time. |
 |
| For the rear tyre i modified a traxxes off road 1/12 Tyre and rim. |
 |
| 1/12 Tyre and rim from Traxxes |
 |
| Because the shaft end is too long the rim can't tighten fully. So both side i add 2 hex adapter size 7.0mm and tighten it hard. |
 |
| Testing time yes the system function |
 |
| Front suspension all moving parts add some greese |
 |
| Using my left over antenna for the chassis |
 |
| Tighten with screw on the bracket |
 |
| This wire is thicker. |
 |
| For the rear axle carrier on rhs that damage . I add new bushing glue it and use a hard hex screw to tighten. |
 |
| The finish resault |
 |
| The after cleaning and repair all function |
 |
| Still using back the front tyre if found i will change it. |
 |
| Rhs side view |
 |
| From top some sticker faded due to washing |
 |
| With new tyre and rim |
 |
| The happy resault |
 |
| Another collection of mine |
That the end resault, i manage to repair and total clean. All electrinic function but not 100%.Still have some glichering due to old system but anyware still can function left right and forward reverse. My no 24 collection. Thanks.
Answer to question given
 |
| Red + to yellow wire also + to switch |
 |
| Yellow wire solder to center switch pin, row with only use 2 pin. |
 |
| From the receiver s black thin wire to the charging port. |
Enjoy RC


Comments
The - wire shoulder to circuit bord
From resever there a thin black wire to the charging port.
I will attach picture
My email: fabiomalves34@gmail.com
Thanks so much for the help !!!!
I've owned it from new, I think I was around 10 years old when it was given to me as a Christmas present. Had many hours of fun playing with it and hoping that my son will also get some enjoyment from it now.